mate and rmate
TextMate is and will always be a modern GUI application. However, developers are often forced to walk in two worlds using both GUI and command-line tools. TextMate has always bridged the gap between these environments with its trusty command-line sidekick: mate.
In TextMate 2, mate has learned some new tricks. A new partner-in-crime has also been introduced: rmate.
In this article will discuss:
- How to install the upgraded
mate mate’s new features- What
rmateis - The different ways to use
rmate
Upgrade Time
Once you have TextMate 2, you need to make sure you refresh the command-line mate application. This allows you to take advantage of its new features.
The installer of this command-line utility has moved in TextMate 2. You can now find it in the TextMate menu under Preferences… in the Terminal pane.
To install or upgrade mate, just select a Location and hit Install. You may be prompted to Replace an old version, if present.
This pane can later be used to uninstall the command if you need to do that.
Users usually install mate into ~/bin if they just need it for the current user and /usr/local/bin if they would rather make it accessible to all users (assuming they have /usr/local/bin in their PATH). If you would like to find where your TextMate 1 version is before you upgrade, feed your Terminal this command: which mate.
Your New mate
Let’s get to the good stuff. What’s upgraded in mate?
First, it’s a small tweak, but you will be happy to hear that mate now works with sudo. You can use this to edit restricted access files in TextMate 2 without being bothered by an authorization dialog on save:
sudo mate /etc/hosts
Next, mate has picked up some new command-line options. One is -t, which allows you to set the type of an opened file. Personally, I like this feature for README files, which I prefer to write in Markdown. Since the name of standard files like this don’t always include an extension, we can just tell TextMate 2 how to handle the file as we open it:
mate -t text.html.markdown README
Another new option is --name. This allows you to set TM_DISPLAYNAME which is typically shown in the title bar on TextMate’s windows. For a good use of that, let me share a line from my Bash configuration:
export GIT_EDITOR="mate --name 'Git Commit Message' -w -l 1"
The -w and -l options have been around for a while. -w just tells TextMate to wait for the edit to finish. That’s what allows you to use the command as an external editor for tools like Git that are waiting for an answer.
-l just tells TextMate to place the caret on the indicated line. I force the first line here because Git has a habit of reusing commit message files and TextMate would otherwise try restore the caret to it’s last location. Since that last location was probably at the end of a message that’s changed or no longer present, the caret would likely be left in the middle of Git’s comments. That’s not too helpful for a quick edit, so -l 1 forces the caret back to the beginning.
That leads us, finally, to the new option used above. Since Git will just use some file like .git/COMMIT_EDITMSG, our window isn’t going to have the best title by default. This use of --name clears that up by telling me exactly what I’m looking at.
Selection Strings
I mentioned before that TextMate 1’s version of mate supported -l. That’s true, but -l is far more powerful in TextMate 2 and that new power has spread to other commands.
With the old version of mate, -l was super simple. It just took a number and it took you to that line. Easy enough.
In the new version, it now takes a Selection String. These are a new tool in TextMate 2 for describing selections. Here’s the formal grammar for a Selection String:
selection    = «range» ('&' «range»)*
range        = «pos» | «normal_range» | «column_range»
pos          = «line» (':' «column»)?
normal_range = «pos» '-' «pos»
column_range = «pos» 'x' «pos»
line         = [1-9][0-9]*
column       = [1-9][0-9]*
OK, geeky, but what does it really mean? Let’s look at some examples.
If I save the above grammar to a selection_string_syntax.txt file, I can open it with the following command:
mate -l 3 selection_string_syntax.txt
That would drop my caret (shown as ‸) at the beginning of the third line:
‸pos = «line» (':' «column»)?
If I prefer though, I can control where it is in the line:
mate -l 3:16 selection_string_syntax.txt
That would place my caret here:
pos = ‸«line» (':' «column»)?
Of course, we can also make a selection:
mate -l 3:32-3:38 selection_string_syntax.txt
That selects (shown between ‸ marks):
pos = «line» (':' «‸column‸»)?
But wait, is this TextMate 2 or what? We have Multiple Carets now, dang it! How do we use more than one at once? Like this:
mate -l '3&6' selection_string_syntax.txt
That places two carets:
selection    = «range» ('&' «range»)*
range        = «pos» | «normal_range» | «column_range»
‸pos          = «line» (':' «column»)?
normal_range = «pos» '-' «pos»
column_range = «pos» 'x' «pos»
‸line         = [1-9][0-9]*
column       = [1-9][0-9]*
You can also make column selections:
mate -l '4:7x5:13' selection_string_syntax.txt
That gives us:
normal‸_range‸ = «pos» '-' «pos»
column‸_range‸ = «pos» 'x' «pos»
Or you can make several unlinked selections using all of the above features:
mate -l '2:18-2:21&3:1-3:4&4:18x5:21&4:30x5:33' selection_string_syntax.txt
Which selects all occurrences of pos for replacement:
selection    = «range» ('&' «range»)*
range        = «‸pos‸» | «normal_range» | «column_range»
‸pos‸          = «line» (':' «column»)?
normal_range = «‸pos‸» '-' «‸pos‸»
column_range = «‸pos‸» 'x' «‸pos‸»
line         = [1-9][0-9]*
column       = [1-9][0-9]*
You get the idea.
The best news about these new Selection Strings is that they aren’t just for mate. You can also use them in the Go to Line (⌘L) and Go to File (⌘T) dialogs. For that latter, you just tack a colon (:) onto the end of the name matching string then follow it up with a Selection String.
This means that you could respond to a warning message like the following:
main.cc:32: warning: no return statement.
by selecting main.cc:32, copying that to the Find clipboard with ⌘E, opening TextMate 2, calling up the Go to File dialog with (⌘T), and pushing ↩ to go straight there. As this shows, Go to File honors the Find clipboard when it matches this format, just to make things like this easier.
Remote mate
In the past, TextMate has suffered with editing files on a server, but that’s all changed now. If you regularly find yourself SSHed into a remote box and wanting to edit a file using TextMate on your own box, your ship has come in.
TextMate 2 now ships with an rmate (Ruby) script that you can drop onto servers. When you trigger rmate on a remote box, it will connect back to your box, allow you to edit, and update the file on the server with the changes.
Let me show you how to get rmate installed on a server you want edit from remotely.
Installing rmate
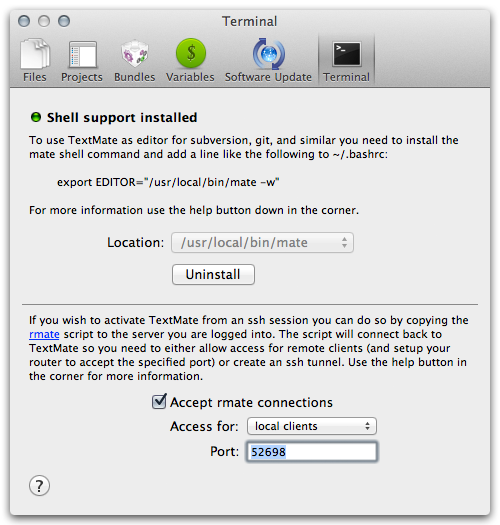
First, we need to copy rmate up to your server. You can find a link to the script in the Preferences… dialog of the TextMate menu, under the Terminal pane. Click that link to open the script, then finish the install with these steps:
- Open a Terminal and type
scpfollowed by a space - Drag the
rmateicon out of the window title bar and drop it into your Terminal to fill in the path to the script - Add another space and then the server you wish to install the script on followed by a colon (
:) and the path to install the script into
Your final command should look something like:
scp /Applications/TextMate.app/Contents/Frameworks/Preferences.framework/Versions/A/Resources/rmate example.com:/usr/local/bin
If you don’t have SSH setup to automatically log you into the server, you may also need to provide the proper authentication options. If your user doesn’t have permission to copy directly into a the directory you want to install into, you may need to upload the script to your user’s home directory, SSH into the remote, and move it into place using sudo. Alternately, you could place it in ~/bin and ensure that directory is in your path.
Back on your own machine, you need to make sure TextMate 2 is ready for the incoming connections. Be sure Accept rmate connections is checked in the Terminal pane of Preferences… in the TextMate menu. You can leave “Access for” on “local clients” though, because I’ll show you a secure trick for bridging the two computers.
The Magic of SSH Tunnels
With the install out of the way, you should be ready to use rmate.
To do it’s job, rmate needs a connection back to your computer so that it can talk to TextMate 2. There are multiple ways you can accomplish this, but probably the best way is to use a reverse SSH tunnel. With the proper setup, you can forward the port rmate likes back to your local machine where TextMate 2 can answer the call-to-duty.
The easiest way to do this is to connect to your server using a command like:
ssh -R 52698:localhost:52698 example.com
The -R option sets up a reverse tunnel. The first 52698 names a port on the remote. It will be connected to localhost:52698 or the same port on the connecting box. That port number is the default for TextMate 2 and rmate, so you should now be able to edit away.
To test things out, just try a command like:
rmate test_file.txt
That should contact TextMate 2 on your local box. Note that TextMate 2 does need to be running for this to work.
Type some content using any TextMate editing features you just can’t live without and save the file. Then check it on your server with:
cat test_file.txt
You should see the content you typed on the server. Magic!
If you try to edit a file you don’t have permission to change on the server, rmate will refuse the edit and warn you:
$ rmate /etc/crontab
File /etc/crontab is not writable! Use -f/--force to open anyway.
You can either use the -f option to force the open in read-only mode or use sudo to get the needed permissions. Remember that rmate is a Ruby script, so RVM users will probably need to use rvmsudo to keep the same Ruby selected:
rvmsudo rmate /etc/crontab
After you verify that things are working, feel free to update your SSH setting to automatically setup the tunnel without you needing to supply the -R arguments all the time.
For a single server just add an entry like the following to your ~/.ssh/config:
Host example.com
RemoteForward 52698 localhost:52698
If you want to make those settings the default for all of your servers, use the wildcard host:
Host *
RemoteForward 52698 localhost:52698
With settings like those in place, a bare ssh command (without -R) should still establish the tunnel for you and allow you to use rmate.
Port Forwarding
SSH tunneling is probably the lowest configuration option for using rmate. It’s also the safest since the computers chat over an encrypted connection. Go that way if you can.
However, if you can’t, you do have other options. One reason you might need these is if you use multiple machines to connect to the same account on one remote. They wouldn’t all be able to use the same port.
Of course, you can specify different ports when you setup TextMate 2 and/or your SSH tunnel. rmate also supports --host and --port options, so you can use those to customize the connection.
One thing you may desire in complex connection scenarios is for rmate to just connect back to where the connection came from. You can have it determine the IP address the SSH connection came from using --host auto.
You will probably need to setup port forwarding of the desired port in your router’s settings to use a connection like this.
The real trick with these connections though is that it’s really the client that knows how things should best be handled. Using another feature of SSH, we can have the client set some variables to the proper details and forward those settings to the remote so rmate can honor them.
A server whitelists the variables it will accept from connecting clients, so you’ll need to edit /etc/ssh/sshd_config. It probably already have these lines in it:
# Allow client to pass locale environment variables
AcceptEnv LANG LC_*
You need to add allowances for RMATE_HOST and RMATE_PORT, so change that second line to read:
AcceptEnv LANG LC_* RMATE_*
You also need a similar entry in your local ~/.ssh/config:
Host example.com
SendEnv RMATE_*
Again, you can put that setting under the host wildcard if you prefer.
Then you can add lines like the following to your local ~/.bashrc:
export RMATE_HOST=auto
export RMATE_PORT=12345
Those settings would be forwarded up to the server when you connect and rmate would use them to connect back to your computer for edits.
Either way, it’s a little work to get rmate setup, but it sure expands TextMate 2 reach once you do. Welcome to remote editing with TextMate.